Showing posts with label appetizer. Show all posts

Friday, May 19, 2017

Parsley Tahini and Crispy Chickpea Crostini


The Fairmount Neighborhood Farmers Market will start up in just over two weeks. Now that summer weather has finally arrived, everyone in our household is craving farm fresh fruits and vegetables. Even the dog has been grazing on grass during her walks and the cat has resumed his afternoon naps in the garden among the herbs.


Although these crostini were just made with grocery store ingredients, the tangy and bright green tahini spread topped with crunchy chickpeas fit the bill for a summery snack. They should help tide us over until the start of the market on June 4.


Parsley Tahini and Crispy Chickpea Crostini
parsley tahini spread 
1 large bunch Italian parsley
juice from one lemon
2 Tbsp tahini
1 Tbsp olive oil
salt to taste

crispy chickpeas
2 cup cooked chickpeas (or one 15 ounce can, drained and rinsed)
2 cloves garlic
peel from one lemon
1 tsp cumin seeds
2 Tbsp olive oil
salt to taste

1 baguette

1. Pluck and wash the parsley leaves and place them in the bowl of a food processor or blender, or you can use a wide mouthed pint sized mason jar with an immersion blender. Using a vegetable peeler, remove the peel from a small lemon and reserve. Juice the lemon into the food processor. Add the tahini and olive oil and a generous pinch of salt. Process until smooth. Taste and add more salt, lemon juice, tahini, or olive oil to suit your taste.

2. Rinse and dry the chickpeas. Peel the garlic cloves and cut them into thin slices. Slice the reserved lemon peel strips into matchsticks. Heat a large skillet over high heat. Add the oil and when it shimmers, add all of the remaining ingredients. Spread the chickpeas in a single layer and allow to fry over high heat, resisting the urge to stir very frequently so that they can crisp up. Cook until most of the chickpeas and garlic slices have acquired some deep color. Taste and add more salt to taste.

3. Slice the baguette into ovals and toast lightly. Spread with the parsley tahini sauce and top with the crispy chickpeas. Enjoy.

Friday, February 14, 2014

Rye-Cocoa Gougeres


The snow and ice storm that swept through Eugene last weekend may have forced us to hold dinner by candlelight, but in general it put a chill on Valentine's Day planning. Still, a little celebration is in order, and as a twist on the endless chocolate sweets, I can recommend these savory rye flour and cocoa gougeres from Chad Robertson's Tartine Book No. 3. I made these with Lonesome Whistle Farm rye, skipped the fancy piping (beyond my skill set) or egg wash (too lazy), and we had these alongside a comforting pot of leek and potato soup. The rye and unsweetened cocoa give these a deep, slightly bitter flavor that is a nice complement to the richness of the dough. A delicious treat to make for your sweetie this Valentine's Day.


Rye-Cocoa Gougeres
from Chad Robertson's Tartine Book No. 3
yield: four dozen gougeres
Rye-Cocoa Pate a Choux Dough
310 ml/ 1 1/4 cup nonfat milk
140 g/ 1/4 cup plus 2 Tbsp unsalted butter
1 tsp fine sea salt
166 g / 1 cup plus 3 Tbsp whole-grain dark rye flour
15 g/ 3 Tbsp unsweetened cocoa powder
250 g/ 5 large eggs, at room temperature 

In a medium heavy-bottomed saucepan, combine the milk, butter, and salt and place over medium heat until the butter melts and the mixture comes to just under a boil. Add the flour and cocoa all at once, stirring vigorously with a wooden spoon. Keep stirring until the mixture has formed a smooth mass, pulls away from the sides of the pan, and some of the moisture has evaporated, about 3 minutes.

Transfer the dough to the bowl of a stand mixer fitted with the paddle attachment or a heatproof mixing bowl.  Add the eggs, one at a time, and mix at medium high speed or vigorously by hand with a wooden spoon, incorporating each egg before adding the next. When all the eggs have been added, the mixture will be very thick, smooth, and shiny. Use immediately.

Gougeres
115 g/ 3/4 cup grated Comte or Gruyere cheese
1 tsp freshly ground black pepper
1 1/2 tsp minced fresh marjoram
1 1/2 tsp minced thyme leaves
1 recipe Rye-Cocoa Pate a Choux Dough

Egg wash
50 g/ 1 large egg
pinch of fine sea salt

Preheat the oven to 425 degrees F. Line a baking sheet with parchment paper. Add 75 g/ 1/2 cup of the cheese, the pepper, the marjoram, and the thyme to the pate a choux dough and stir well with a rubber spatula to incorporate.

Transfer the dough to a pastry bag fitted with a 1/2 inch tip. Pipe 1 inch rounds onto the prepared baking sheet, spacing them about 1 1/2 inches apart, or use a spoon to drop the dough into 1 inch mounds.

To make the egg wash: in a small bowl, whisk together the egg and salt. Lightly brush the top of each dough mound with the egg wash , then top with the remaining 40 g/ 1/4 cup cheese, dividing evenly.

Bake for 25 to 30 minutes, until puffed, golden brown, and light for their size, rotating the baking sheet after 20 minutes to ensure even browning. Serve warm. You can also cool completely and store in the refrigerator in an airtight container for a few days. To serve, recrisp for 5 minutes at 350 degrees.

Note: you can form the gougers on a baking sheet, place in the freezer unto, frozen, and then transfer to an airtight container and freeze for up to 1 month. Bake them straight from the freezer on a parchment lined baking sheet.  Brush the tops lightly with egg wash, sprinkle with cheese before baking, and increase the baking time by about 10 minutes.

Friday, September 27, 2013

Grilled Eggplant Salads and Dips


This Sunday will be the penultimate Fairmount Neighborhood Farmers Market of the season. You can look forward to the following offerings from Sweetwater Farm, Fair Valley Farm, and Tiger Lily Art Company:

heirloom tomatoes, romas, and tomato deals: 10 lbs/$18, $20 lbs/$30 (preserve for winter)
watermelon, honeydew melons, cantaloupes, and other heirloom melons
Bartlett pears (delicious on pizza or in pancakes)
Akane apples and Asian pears from SLO Farm (make apple sauce)
A wide selection of winter squash, including delicata (delicious roasted for salads)
corn, green beans and yellow wax beans (make a savory corn pudding)
pepperoncini, poblanos, red hot cherries, anaheim chiles, and assorted pepper bargain bags
eggplants, fresh spring garlic, and onions (make one of these eggplant dishes)
cucumbers and zucchini (make pasta primavera for the fall)
carrots, cabbage, kohlrabi, and celery (make Pad Thai)
French sorrel and cutting celery (great as a pesto for soup)
new potatoes and beets (make a hash)
fresh herbs including dill, parsley, basil, and cilantro 
bietola, kale, chard, and a variety of lettuces (make lettuce wraps)
dried beans and grains from Camus Country Mill (make teff grain muffins)
jams, salsa, and pickles from Sweet Creek Foods
pastured chickens from Fair Valley Farm (cook up a pot of Pueblan chicken tinga)
floral arrangements from Tiger Lily Art Company


The chilly, damp fall weather is here in earnest, but we can still enjoy a couple more weeks of summer produce, like tomatoes, corn, and eggplant, and a few more opportunities to fire up the grill. If you do, be sure to throw on some eggplants, because once they collapse into charred masses, their soften insides are the perfect palette for any number of dips and salads. If it's too rainy to grill, you can char your eggplant under the broiler or directly over a gas flame, like a bell pepper, until it is blackened and soft (but avoid doing this in a hotel with very sensitive smoke detectors, as I did this summer). 


Smokey Middle Eastern baba ganoush is a delicious and familiar eggplant dip that is best shoveled with warm pita. I came across an interesting variant of this in Fuchsia Dunlop's Every Grain of Rice: Simple Chinese Home Cooking. It has the same smokey eggplant and pungent garlic, the same salty tanginess (from soy and vinegar, as opposed to salt and lemon juice) and even contains sesame (seeds, not paste), but is an entirely different dish that works as a refreshing salad appetizer. Pick up plenty of eggplants this Sunday to try both ways.


Baba Ganoush
2 large eggplants
2 cloves garlic
juice from 1 lemon
1/3 cup tahini
1 tsp pomegranate molasses
1 Tbsp olive oil, and more for drizzling
generous pinch of salt
Walnuts and mint leaves for garnish (optional)

1. Char the eggplants on a grill or under the broiler for about 30 minutes, or over gas flames for about 10 minutes, turning with tongs, until they are completely soft and collapsed. At the same time, roast a couple of cloves of garlic in a small cast iron pan on the grill, under the broiler, or on the stove, until soft (if you don't mind raw garlic, you can skip this step). Cool the eggplant until you can handle them and then peel off the charred skin with a pairing knife or your fingers. Place the softened pulp in a strainer for about 15 minutes to drain out some of the liquid. 

2. Peel the roasted garlic cloves and in a mixing bowl, mash them into a paste with a fork or pestle. Transfer the drained eggplant to the bowl and add the tahini, lemon juice, olive oil, pomegranate molasses, and a pinch of salt. Mash with a potato masher or a pestle until well mixed and the desired consistency. Taste and add a bit more of any of the ingredients to adjust the flavors to your liking. Spread out on a plate and drizzle with olive oil. Garnish with herbs or nuts if you like and serve with warm pita bread.


Chinese Smokey Eggplant with Garlic
adapted from Fuchsia Dunlop's Every Grain of Rice

2 large eggplants
2 cloves garlic
2 tsp light soy sauce
2 tsp Chinkiang vinegar
2 Tbsp chili oil with its sediment (or use a diced fresh hot pepper and 2 Tbsp sesame oil)
1 tsp sesame seeds
2 Tbsp finely sliced scallions (green part only) 
Cilantro leaves for garnish (optional)

1. Prepare the eggplant and garlic cloves as in the recipe above.

2. Mince the garlic and dice the eggplant pulp. Combine in a bowl and toss with the remaining ingredients. Garnish with cilantro leaves if you like and serve as a salad appetizer.

Saturday, May 4, 2013

Bok Choy and Pork Dumplings


After we had children, we had to scale back on certain culinary undertakings, such as staging elaborate dinner parties. But as our children have grown (our youngest just attended his kindergarden orientation on Friday), it's become clear that certain ambitious cooking tasks are easier with children. In our household, making fresh pasta is entirely accomplished through child labor, and even birthday cake baking has been delegated. Recently my sister-in-law pointed out that dumpling making is another such child-friendly task, if you invest in a dumpling press.


Dumpling making is not a task I would take on single handed, but armed with our new gadget, I cooked up a recipe of pork and cabbage filling from Fuchsia Dunlop's Land of Plenty, using tender baby bok choy from the Farmers Market, and let my sous chefs go to town.


The end results may not have been quite as pretty as expertly hand-pinched pot stickers, but they tasted delicious and our little assembly line was so productive that we had enough dumplings to freeze for a rainy day.  


Bok Choy and Pork Dumplings
adapted from Fuchsia Dunlop's Land of Plenty
makes 25-30 dumplings
1/4 pound tender leaves of baby bok choy or cabbage
3 Tbsp neutral oil such as canola
1/2 lb ground pork
2 tsp rice wine
1 tsp light soy sauce
1 tsp darl soy sauce
1/2 tsp salt
1 tsp sesame oil
6-8 turns of a black pepper mill

1 package of frozen thin dumpling wrappers
more neutral oil for frying

1. Start thawing the dumpling wrappers about 30 minutes before, or microwave them briefly on low power.

2. Blanch the vegetable leaves briefly in boiling water, and then refresh immediately in cold water. Chop finely and squeeze to get rid of any excess water.

3. Heat 3 Tbsp oil in a wok or skillet. Add the pork and stir-fry for a minute or two, adding the wine, soy sauce, and salt as you go, until cooked through. Tip the pork into a bowl, add the chopped leaves, sesame oil, and pepper, and mix well.

4. To assembly the dumplings, gather a large platter or baking sheet, a small bowl of water, your filling, and the dumpling wrappers covered with a moist towel. Spoon a teaspoon of filling into the center of a dumpling wrapper, use your finger to wet around the circumference, and seal the dumpling with a dumpling press or by pressing closed with your fingers. Place the completed dumplings on the platter.

5. Heat a larger skillet with a cover over medium heat. Add enough oil to coat the bottom generously. When the oil is hot, arrange the dumplings in the pan and cook until crisp and golden on one side (a minute or two). Then add 2 Tbsp water for every 10 dumplings in the pan, cover and steam for 2-3 minutes. Uncover and allow the water to evaporate away. Remove the dumplings to a serving platter and serve at once with a dipping sauce of soy sauce, black Chinese vinegar, and hot oil combined to your taste.

Note: freeze extra dumplings on a baking sheet and then transfer them to a zip lock bag. To cook, add the frozen dumplings to the pan as above, but increase the frying and steaming times by a couple of minutes.

Saturday, March 16, 2013

Chicken Liver Pate and Sunchoke Pickles


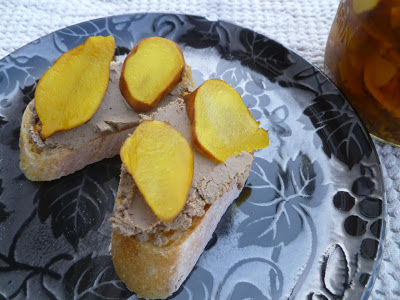
Chicken liver pate is a dish I remember fondly from my childhood as a fancy indulgence, rich and boozy, prepared for special occasions. Then at some point the combined threats of concentrated environmental toxins and artery-clogging cholesterol seemed to banish this dish from our family table and restaurant menus. Fair Valley Farm's conscientious animal husbandry alleviates the first concern, and  the cholesterol hysteria has wained a bit. So I decided to try my hand at this dish with a pound of Fair Valley Farm's chicken livers. However, the three sticks of butter that Jacque Pepin's classic French recipe would require did give me pause. After a little searching around, I came across this Tuscan chicken liver pate from food52 contributor gluttonforlife, flavored with capers, anchovies, lemon zest and Parmesan. The resulting spread was as rich and creamy as I remembered, and a splash of sherry rounded out the flavor. 


The final touch, a stroke of genius I would say, was to layer on some sunchoke pickles. These had been made in a frenzy with Open Oak Farm tubers that needed my attention before I left on a short trip. Sunchokes (also known as Jerusalem artichokes) resemble potatoes in appearance, but have a distinctive sweet, almost citrus flavor, and bright crunch due to their high inulin content instead of potatoes' starch. A less accessible complex sugar (appropriate for diabetics), inulin is considered a "prebiotic" that promotes healthy gut bacteria. This is all well and good, but a pile of gnarly sunchokes can be intimidating.


Confronted with these unfamiliar vegetables, I turned, as I often do in such situations, to The Victory Garden Cookbook by Marian Morash. Her last entry for Jerusalem artichokes was a pickle recipe, which called for a day of soaking in salty water, before being plunged in a vinegary bath. While picked fennel was a revelation last summer, these sunchokes are my new favorite. Their distinctive flavor shines through the vinegar and they made the perfect complement to the creamy pate slathered on Eugene City Bakery polenta baguette. There may even be a scientific basis for this complementarity, as inulin has been shown to have cholesterol-lowering properties: guilt-free pate sandwiches.


Tuscan Chicken Liver Pate
1 pound (preferably) organic chicken livers
2 tablespoons unsalted butter
2 tablespoons extra virgin olive oil
2 large shallots, thinly sliced
1 large garlic clove, smashed
3 anchovy fillets (or 1 tablespoon anchovy paste), chopped
1 tablespoon capers, minced
4 to 6 sage leaves, chopped
Salt and freshly ground black pepper
2/3 cup dry white wine
1/2 teaspoon grated lemon zest
1/2 cup grated Parmesan

1. In a large skillet, melt the butter and olive oil over medium-high heat. Saute the shallots, garlic, anchovies, capers and sage until the shallots are lightly browned, 6 minutes or so.

2. Season the chicken livers with salt and pepper and add them to the pan. Cook over high heat until browned, then add 1/3 cup of the wine and keep stirring with a wooden spoon, breaking up the livers as they start to cook through. When the wine is absorbed, add the remaining 1/3 cup and repeat the process.

3. Remove from the heat and transfer the mixture to a food processor. Process until quite smooth, then add the lemon zest and Parmesan and process again. Taste and add salt or pepper as needed. Serve warm or at room temperature, spread on good bread.

Note 1: for a looser, more mousse-like spread, don't let all the liquid evaporate from the pan. You can always adjust the consistency as you buzz it in the food processor by drizzling in olive oil, water or even wine as you mix in the food processor. I added a splash of sherry during the processing for a nice alcohol note.

Note 2: a pound a chicken liver pate may seem like a lot of a good thing. You can proceed with making this recipe prior to the point of adding the Parmesan cheese, then freeze half of it to finish later.


Sunchoke Pickles 

About 20 sunchokes
juice of one lemon
kosher salt for brining
1/2  cup water

3 cups apple cider vinegar

1/2 cup rice wine vinegar
1/4 cup sugar
1/2 tsp salt
1 tsp fennel seed

1 tsp mustard seed
1/2  tsp turmeric powder

1/4 teaspoon chili flakes


1. Scrub the sunchokes very well with a vegetable brush and remove any stringy bits. Prepare a bowl of salty cold water with lemon juice for brining the sunchokes, with 1 Tbsp kosher salt for each cup of water (you will need about 4 cups).

2. Slice the sunchokes into thin slices (about 1/8 inch thick) and submerge the slices into the brine. Cover and let soak for about 24 hours. 

3. The next day, prepare the pickling vinegar by combining in a small sauce pan the water, vinegar, sugar, salt, and spcies. Bring to a simmer and cook until the sugar dissolves, about five minutes. 

4. Let the vinegar cool for a moment while you rinse the sunchoke slices and pack them into clean glass jars. 2 pint jars or one quart jar should work. Now pour the vinegar solution over the sunchoke slices and press them down to submerge them. Seal the jars loosely, let them cool and then refrigerate. The pickles will be good to eat in a day and will keep for a few weeks.

Friday, March 8, 2013

Ume Grill's Japanese Style Rice Balls


Neighborhood food cart aficionados have been happy to see the return of Ume Grill to the Sun Automotive lot on the corner of 19th and Agate (now located in back, away from 19th). In addition to an expanded menu with chicken and tofu teriyaki, a new Ume offering is beautifully prepared bento boxes to go. On Thursdays, Ume will deliver pre-ordered bento boxes to Edison Elementary and Roosevelt Middle Schools as a welcome alternative to the unfortunately dismal cafeteria fare.


Ume co-owner Helen (aka Mama Ume), who in the past has graciously shared her recipe for tsukemono, was kind enough to help the Edison Girl Scouts earn their cooking badges by teaching them how to make their very own rice balls (example above). Helen even brought each girl her own bento box kit, complete with fun rice ball molds.


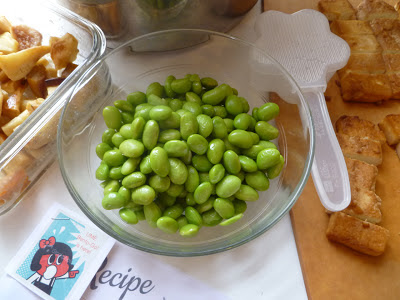
My resident Girl Scout was eager to teach me her new skills. We prepared rice, baked tofu, and edamame beans, and I cut up some leftover roasted parsnips and rutabaga. She demonstrated the proper rice packing, complete with finger dipping in salty water, and we sprinkled the rice balls with black sesame seeds (on hand from making gomae sauce)I was the only taker for cooked purple barley mixed into the rice, but the heart shaped rutabaga slices were consumed with enthusiasm, making me think that there is room for a rutabaga lover badge in the Girls Scout pantheon, between "entertainment technology" and "social butterfly." Thanks Ume Grill for sharing these delicious treats.


Ume Grill's Japanese Style Rice Balls

The beauty of these rice balls is that you can improvise and tailor them to any taste. This recipe gives the basic outline but you can pack them with whatever strikes your fancy.

You should gather together:
cooked rice (about 1/2 cup per rice ball, Helen recommends "hapa" rice: 3 parts medium grain white rice and 1 part brown rice)
a small bowl of sea salt water for finger dipping
rice mold (or use a teacup or ramekin lined with plastic wrap) 

any of the following fillings:
baked tofu (recipe below)
teriyaki beef or chicken
cooked edamame beans
carrots, cucumber, and other vegetables sliced into pretty shapes by hand or with a cutter

and some toppings:
nori seaweed sheets
sesame seeds
more sliced vegetables

Scoop some rice into the mold. Wet your fingers in the sea salt water and pat down the rice into a firm layer. Add some fillings (protein and vegetables). Add another layer or rice and pat down with wet fingers. Close the mold firmly to completely compress the rice ball. Open the mold and carefully dislodge the rice ball by inverting over your hand and pressing on the release tab on the back. Decorate the rice ball with strips of moistened nori, sesame seeds, and more sliced vegetables. Enjoy.

Baked tofu
1 package extra firm tofu
3 Tbsp soy sauce
1 Tbsp rice vinegar
1/2 tsp sugar
1/2 tsp sesame oil

Slice the tofu into 3/4 inch thick slabs. In a shallow baking dish, mix the marinade ingredients. Place the tofu slabs in the marinade and flip to coat both sides. Marinade for 30 minutes or so. Bake at 400 degrees for about 10 minutes per side, until the tofu has dried and firmed. I do this in a toaster oven. Once baked, cut the tofu slabs into desired sized pieces, or use a small cookie cutter for fun bento shapes.

Saturday, March 2, 2013

Mung Bean Pancakes with Kimchi


With a large supply of kimchi from our Open Oak Farm cabbages, a recent New York Times recipe for kimchi mung bean pancakes caught my eye. 


The article was about cooking with kids (in this case the daughter of chefs Jean-Georges and Marja Vongerichten).  I was skeptical that our kids would try pancakes with kimchi (my jars of fermenting cabbage are a source of jokes for them right now, but someday they will see the light). However, I thought the basic principle (similar to falafel) of making a batter from soaked, raw legumes could be the starting point for all sorts of pancakes. So for my recipe I left out the kimchi juice from the batter and incorporated grated raw carrots and chopped mint into half for kid-friendly Korean style latkes. Both versions were delicious as appetizers for dinner, and the remaining batter made a tasty lunch of fritters on top of a green salad. 


Mung Bean Pancakes
adapted from “The Kimchi Chronicles,” by Marja Vongerichten and Julia Turshen
makes about 20 pancakes
batter
2 cups split mung beans
1/4 cup short grain rice, such as sweet rice
1 cup water
1 tsp fish sauce (optional)
1 tsp soy sauce
1 tsp sesame oil
pinch of salt
1 cup kimchi (or 1 cup grated carrots and chopped mint, plus more salt)
neutral oil, such as canola, for frying

dipping sauce
1/4 cup soy sauce
1 tsp sugar
1 Tbsp sesame oil
1 Tbsp rice vinegar
1/8 tsp red pepper flakes
2 scallions, green and white parts finely chopped

for serving
cilantro leaves
lime slices
sriracha sauce

1. Combine the mung beans and rice in a fine-meshed colander and rinse well with cold water. Transfer to a bowl and add 8 cups of lukewarm water. Cover the bowl and soak at room temperature for at least 6 hours and up to 24 hours, changing the water once or twice.

2. Prepare the pancake batter by draining the soaked beans and rice and transferring them to the jar of a blender. Add 1 cup water, the fish sauce (if using), sesame oil, soy sauce, and salt and blend into a slightly coarse paste. Do not overmix. Transfer to a large bowl, finely chop the kimchi and stir into the batter. You could also divide the batter into two bowls and incorporate 1/2 cup finely chopped kimchi into one and 1/2 cup grated carrots, chopped mint, and a pinch of salt into the other.

3. To fry the pancakes, heat a large skillet, such as cast iron, over medium heat and add 1 to 2 tablespoons of the vegetable oil. Heat until the oil shimmers. Using a 1/4 cup measure, ladle in the pancake batter, flattening each pancake to 1/3-inch thickness. Cook until crisp and browned on one side, about 4 minutes. Flip the pancakes and cook until browned on the other side, another 2 to 4 minutes. Transfer to a paper towel-lined plate.

4. While the pancakes are cooking, you can make the dipping sauce by combining the soy sauce, sesame oil, rice vinegar, red pepper, and scallions in a small bowl and mix until blended.

5. Serve the pancakes warm with the dipping sauce, cilantro leaves, lime slices, and sriracha.

Thursday, February 14, 2013

Puff Pastry Pesto Hearts


Here's a fun quick treat for your sweetie: puff pastry pesto hearts. We had them for dinner to accompany a favorite family soup, and they were devoured with gusto. Happy Valentine's Day.


Puff Pastry Pesto Hearts
makes about twenty
2 sheets frozen puff pastry
1 cup pesto (such as this recipe from the post below)

1. Preheat the oven to 375 degrees. Cover two baking sheets with parchment paper. 

2. Partially thaw the pastry (you can do this in a microwave on low power for a minute or two). Spread out a sheet of pastry. Top with 1/2 cup pesto and spread over the surface. Roll from two sides to make a double log. Carefully slice into 3/4 inch wide slices. Repeat with the second sheet of pastry and remaining pesto. 

3. Arrange the pastry slices on the parchment paper cookie sheets. For each slice, pinch the section between the two rolls to form a heart. Bake for approximately 16 minutes, rotating the pans 180 degrees and top to bottom midway through, until the pastries are golden brown.