Friday, January 25, 2013

Beet Pasta with Kale Pesto


Here in the Willamette Valley, we've been socked in for days with fog and drizzle. To combat the gloomy grayness, I recommend eating outrageously colorful food. From our stash of Open Oak Farm beets and kale, I made magenta pasta dough,


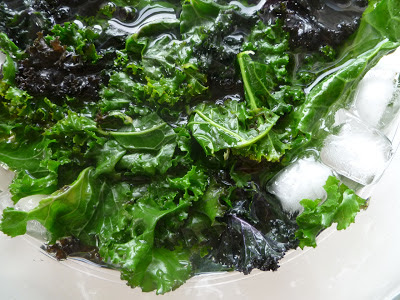
and blanched kale leaves for a vivid green winter pesto brightened with lemon zest. 


The noodles leeched a little of their color during cooking, going from magenta to hot pink in the lipstick color spectrum, but they were still bright enough to put a smile on everyone's face.   


Kale Pesto
1 bunch kale 
1/2 cup walnuts
1/2 cup olive oil
2 garlic cloves
zest from one lemon
fresh ground pepper
salt to taste

1. Set a large pot of salted water to boil. Rinse the kale leaves and cut the leaves from the center ribs. Prepare a large bowl of ice water. When the water is boiling, add the kale leaves and blanch for one minute until the leaves are bright green but not too wilted. Remove the leaves from the water with a large slotted spoon or tongs and submerge into the ice water to prevent them from over-cooking. You can save the hot kale water for cooking the pasta. Squeeze the kale leaves to remove as much water as possible and reserve.

2. Heat a dry skillet and toast the unpeeled garlic cloves until they start to blacken and soften. Now toast the walnuts for a couple of minutes, stirring, until they smell fragrant but being careful that they don't burn. Peel the garlic cloves and put them in the bowl of a food processor along with the toasted walnuts. Add the lemon zest and pulse until the walnuts are small pieces. Now add the blanched kale leaves, a grind of fresh pepper, and a generous pinch of salt. Process while pouring in the olive oil until you have a fairly smooth paste. Taste and add more salt, pepper, olive oil, or some juice from the zested lemon as desired. Transfer the pesto to a large serving bowl.

Beet Pasta
serves four

2 small or 1 medium beet
3 eggs
~3 cups all purpose flour

1. Peel and quarter the beets and roast them at 350 degrees until soft, for about half an hour. Alternatively, you could boil or steam them.

2. In a food processor, puree the cooked beet. Now add the eggs and puree until smooth. Then add 2 1/2 cups flour and process. If the dough is too sticky, keep adding flour until it forms a firm ball and no longer sticks to your finger when pressed. 

3. Transfer the dough to a floured surface and cut it into about a dozen pieces. Flatten the pieces through a hand-crank pasta maker, dusting with flour as needed, and cut into fettucini. 

4. While processing the dough, get a large pot of salted water heating (this could be the same water that you blanched the kale leaves in). When the water is at a rolling boil, put in the cut pasta and use tongs to separate the pieces. Reserve a half cup of pasta water in case you want to thin the pesto a little. The pasta will be done shortly after the water comes back to a boil. Taste it to make sure it is cooked, and drain.  Immediately toss the pasta with the pesto. Add a little pasta water if it seems too dry. Serve with plenty of freshly grated parmesan cheese. Alternatively, or in addition, toss in cubed feta or ricotta salata. Enjoy.

Sunday, January 20, 2013

Soft Tofu Hotpot (Soondubu Jjigae)


Our latest favorite use for homemade kimchi is in Korean stews cooked with soft tofu. Here is my husband's guest post about this winter treat.


In the winter a young man's fancy lightly turns to thoughts of soondubu jjigae, or Korean soft tofu hotpot. This easy dish is perfect for cold evenings, and the combination of a broth overloaded with richness and custard-soft tofu gives a great framework for adding whatever is handy around the kitchen. It does take a few specialty items and ingredients, but it is well worth a trip to an Asian grocery to pick them up. The first is the hotpot, a stone pot coated in enamel. In Eugene, Sunrise market carries these in the back corner. Other specialty items (also available at Sunrise) are soon tofu, which is even softer than soft or silken tofu, and Korean chili paste, Gochujang (this comes in a tub or as a sweeter condiment in a ketchup-style bottle, get the tub).


Soft Tofu Hotpot (Soondubu Jjigae)
serves two (split ingredients between two hot pots)
1 tablespoon vegetable oil
1/3 lb top sirloin, sliced thin against the grain (or try a seafood version, adding clams and mussels to the broth)
3 garlic cloves, minced
3 green onions, sliced into rounds.
1 tablespoon fish sauce
1/2 tablespoon soy sauce
2 tablespoons Gochujang
vegetables -- beet greens, kale, carrot, zucchini, whatever.
1/2 cup sliced rice cake (optional)
2 cups good stock (I used homemade chicken stock)
1/4 cup diced shiitake mushrooms
4 tablespoons kimchi
1 small package soon tofu

for serving
dried kelp
2 eggs
cooked white rice

1. Set the hot pots directly on the stove top and heat with a medium low heat. Then set some rice cooking, so it will be ready along with everything else. Next, slice the sirloin, mince the garlic and cut the green onion. Then prep the vegetables (slicing carrots or washing greens). 

2. Turn the heat up to medium, and add the oil to the hot pots. Add the sliced sirloin, letting it sear a bit on one side (around a minute). Give the meat a stir, then add the minced garlic and the white part of the chopped green onion. Stir for another minute. Add the fish sauce, soy sauce and Gochujang. Stir a bit, then add the stock, fresh vegetables that need more cooking time, such as carrots, shiitake mushrooms, and rice cakes, if using. At this point I turn the heat up a bit more, to get the broth boiling. As it all heats up, add the kimchi. After heating for several minutes, the soon tofu can be gently spooned into the broth, taking care not to break it up. You can add other things as well, such as greens and zucchini. Don't overfill the hot pot though, or else you may end up severely burned transporting it to the table!

3. Get the table ready, bringing out the rice, kelp sheets, green onion greens, and an egg for each person. Also put out a heat-resistant pad for each hot pot! At this point, the hot pot should be at a good simmer, so put on oven mitts and carefully carry each hot pot out to the table. As soon as it is served, each diner should crack an egg into the hotpot and immediately break the egg yolk with a fork, giving it a good stir so the egg dissipates into the broth. Tear in some kelp, sprinkle on green onion, and then add rice as you eat, which slowly thickens the broth over time. The richness of the broth comes from the seared beef, fish sauce, mushroom, stock, kelp and stirred-in egg, all of which add to the incredible umami flavor. The hot pot keeps the contents searingly hot until the end, and the Gochujang gives a spiciness that adds to the overall warming sensation.

Monday, January 14, 2013

Buckwheat and Jam Scones


I admit to being slightly obsessed with the smokey, nutty flavor of buckwheat flour and how it can transform cakes, cookies, and pancakes. So when I finally got to the top of the wait list for the Eugene Public Library's copy of Kim Boyce's cookbook Good to the Grain on baking with whole wheat flours, I was immediately drawn to her recipe for figgy buckwheat scones. Her fig butter sounded amazing, but also a lot of work and instead I decided to use up the last of a batch of hardy kiwi, quince, and raspberry jam that my husband had made in the fall. 


I followed Heidi Swanson's suggestion on this recipe and made the dough in a food processor. Then, perhaps with a bit too much confidence, I flattened it out (a little thinner than the specified 3/4 inch) and slathered it with jam (a little more than the specified 1 cup).


During the subsequent jelly roll step things got a little too messy to document (and I wouldn't advise letting the jam-covered dough warm up while you scour your house for a hole puncher that is needed at that very instant for a time-sensitive book binding project).


However, despite the slightly gory process involved in producing these spirals, the final scones baked up beautifully. The dough was tender and had that smoky buckwheat flavor I've grown to love. When figs are in season, I'll try Kim Boyce's butter, but in the meantime I look forward to pairing this scone dough with any of a variety of fillings. Hazelnuts and chocolate chips (as in these rugelach) might be next.


Buckwheat and Jam Scones
adapted from Kim Boyce's Good to the Grain

Dry mix:
1 cup (4.75 oz / 135 g) buckwheat flour
1 1/4 cups (5.5 oz / 160 g) all-purpose flour
1/2 cup (2.5 oz / 70 g) sugar
2 teaspoons baking powder
1/2 teaspoon kosher salt

Wet mix:
4 ounces (113 g) cold unsalted butter, cut into 1/4-inch pieces
1 1/4 cups (10 fl. oz / 300 ml) heavy cream

1 cup (8 oz) jam or jelly (such as Boyce's fig butter described here)

1. Sift the dry ingredients into a large bowl, pouring back into the bowl any bits of grain or other ingredients that may remain in the sifter.

2. Pour the dry ingredients into a food processor bowl and pulse to mix. Add the cubed butter and pulse until the butter is cut into pea-sized pieces. Add the cream and pulse a few more times, just until the dough is combined. You can also prepare the dough by hand, but work quickly so that the butter remains chilled.

3. Use a pastry scraper or a spatula to transfer the dough onto a well-floured surface. It will be sticky, so flour your hands and pat the dough into a rectangle. Grab a rolling pin and roll the dough into a rectangle that is 8 inches wide, 16 inches long, and 3/4 inch thick. If at any time the dough rolls off in a different direction, use your hands to square the corners and pat it back into shape. As you're rolling, periodically run a pastry scraper or spatula underneath to loosen the dough, flour the surface, and continue rolling. This keeps the dough from sticking. Flour the top of the dough if the rolling pin is sticking.

5. Spread the jam over the dough, leaving a couple of inches from one of the long edges that will be your final seam. From the other long edge, roll the the dough up, patting the dough as you roll so that it forms a neat log 16 inches long. Roll the finished log so that the seam is on the bottom and the weight of the roll seals the edge.

6. Use a sharp knife to slice the log in half. Wrap the logs in plastic wrap, place them on a baking sheet or plate, and chill in the refrigerator for 30 minutes. (The dough can be kept, covered, in the refrigerator for 2 days.) While the dough is chilling, preheat the oven to 350°F. Line two baking sheets with parchment paper.

7. After 30 minutes, take both logs out of the refrigerator and cut each half into 6 equal pieces about 11/4 inches wide. Place each scone flat, with the spiral of the jam facing up, on a parchment paper-covered baking sheet, 6 to a sheet. Give the scones a squeeze to shape them into rounds.

8. Bake for 38 to 42 minutes, rotating the sheets halfway through. The scones are ready to come out when their undersides are golden brown. They are best eaten warm from the oven or later that same day. (You can always save one of the logs to bake on a subsequent day).

Makes 12 scones.

Thursday, January 10, 2013

Fun With Fermentation


Here's my latest batch of kimchi, made with purple savoy cabbage, turnips, carrots, and green onions. The quart jar is dwarfed by my new sauerkraut crock, a Christmas present from my sister-in-law. In my family, plentiful sauerkraut consumption around the New Year is equated with wealth, so I'm feeling like a billionaire. And for instructions on how best to nurture a happily fermenting culture of lactic acid bacteria in my crock, I'm planning on going to the Fun With Fermentation Festival this Saturday January 12 from 11:00 - 4:00 at the WOW Hall. For those of you who miss the Fairmount Neighborhood Farmers Market supply of delicious sauerkraut, John Karlik from Sweetwater Farm will be demonstrating how to make your own.

Saturday, January 5, 2013

Turkey Craw Tacos with Chard and Baked Cotija Cheese


One of my New Year's resolutions is to increase our family's repertoire of simple dinners that can be enjoyed by all members, including my newly hyper-picky son. For us, one of the best strategies is to have dinners that can be easily deconstructed into their component parts. So although I was craving a pot of spicy chile or some cheesy enchiladas, I opted to cook up a simple, unflavored pot of these lovely turkey craw beans from Lonesome Whistle Farm as toppings for self-assembled tacos.


For a leafy base, I sauteed up Swiss chard (from Open Oak) with caramelized onions, finishing with a splash of sherry. 


And for a cheesy topping, I made a variant of this baked feta using cotija cheese layered on a bed of seared onion slices and topped with some spicy tomatoes. Seared cherry tomatoes and jalapenos would have been nice, but I made due with the can of fire roasted tomatoes that I had in the pantry.


The kids had cheese quesadillas with beans and avocado on the side, while my husband and I layered up our tortillas with all the fixings. The spicy baked cojita satisfied my enchilada craving, and I liked being able to savor the separate flavors of the tender beans and grassy chard. I look forward to more accommodating, uncompromising dinners in 2013. 


Turkey Craw Tacos with Chard and Baked Cotija Cheese

1 cup dried turkey craw beans (or substitute pinto beans)
salt to taste
1 large onion
olive oil
1/2 tsp ground chipotle chili powder, or substitute 1 fresh jalapeno, diced
1 Tbsp ground cumin
14 ounce can of fire roasted tomatoes, or 1 cup cherry tomatoes
4 to 6 ounces cotija cheese
1 bunch Swiss chard
splash of dry sherry
corn or flour tortillas
avocado for topping

1. Sort through the beans to remove any pebbles and rinse them. If you have time, soak them for a few hours or overnight. Put them in a pot with approximately 2 1/2 cups of fresh water and simmer them on very low heat until the beans are soft, about 2 1/2 hours. Salt very generously.

2. To prepare the baked cotija cheese, preheat the oven to 450 degrees. Peel the onion and slice half of it into thin rings. Heat a skillet until it is very hot. Add one Tbsp olive oil and sear the onions over high heat until they start to brown. Spread the seared onions over the bottom of a baking dish. Add another Tbsp of olive oil to the skillet, add the spices and cook quickly in the oil, then add the tomatoes and a pinch of salt and sear for about five minutes. In the meantime, cut the cotija cheese into 1/4 inch thick slices and arrange over the seared onions. Top the cheese with the spicy tomatoes, drizzle over a little more olive oil, and bake for about 15 minutes until the tomatoes are bubbling and a little charred.

3. While the cheese is baking, prepare the Swiss chard. Dice the remaining half onion. Wash the Swiss chard and trim the ends of the stems. Cut the stems from the chard leaves and dice them, and chop the leaves. Heat a saute pan over medium high heat. Add 2 Tbsp olive oil and the onions and saute until they start to become glassy. Add the chard stems and continue sauteing until the onion is nicely caramelized (but do not let it brown). Add the chard leaves and a generous pinch of salt. Saute until the leaves are wilted. Add a splash of sherry and cook one more minute.

4. Heat tortillas on a griddle and chop the avocado. Assemble the tacos by layering on a scoop of chard, followed by a scoop of beans, followed by a scoop of the baked cotija cheese with tomatoes and onions. Top with avocado and eat at once.