Sunday, June 26, 2011

Wheatberries with Snap Peas and Magenta Spreen


Songbird Farm is a new addition to the Fairmount Neighborhood Farmers Market, selling fresh eggs, basil, salad greens, chard, plant starts, and propolis salve, made from beeswax.


This week they had these amazing colored salad greens, called magenta spreen, 


and SLO Farm had these plump, fresh snap peas.


I decided to combine these with wheatberries from Camas Country Mill. I'd never cooked wheatberries before, but they proved to be quite easy, if you just set them simmer about an hour and a half before you plan to eat. Because I love the combination of peas with ham and mint, I sauteed some cubed ham with sliced snap peas for a few minutes, then stirred in some sliced mint leaves and several scoops of cooked wheat berries, and finished it with a splash of sherry. For a vegetarian version, you could substitute shiitake mushrooms for the ham, or stir in some cubes of feta cheese at the end. The magenta spreen made a colorful garnish for this fresh and filling dish.


Wheatberries with Snap Peas and Ham


1 cup wheatberries
2 large handfuls of snap peas
1/3 cup ham cut into 1/4 inch cubes
1 Tbsp olive oil
8 mint leaves
splash of sherry
salt and pepper to taste
magenta spreen or other salad greens for garnish


1. To cook the wheatberries, combine one cup of grain with two cups of salted water and simmer, covered for one and a quarter hours. Taste for firmness and continue cooking until it reaches the desired consistency, maintaining a firm bite. If there's some water remaining, you can boil it off towards the end with the pot uncovered, or drain the cooked grains in a fine mesh colander.


2. Remove the stems from the snap peas and slice into thirds. Heat the olive oil in a pan, add the ham cubes and saute for a minute. Add the snap peas and saute for about 5 minutes until the snap peas turn more green but before they lose their crunch. Add one cup of cooked wheatberries, reserving the rest for another use. Stir to coat, then add a splash of sherry and let this boil off. Taste for seasoning and serve warm with a garnish of salad greens.

Monday, June 20, 2011

Market Start 2011


The Fairmount Neighborhood Farmers Market got off to a great start this past Sunday. 


There were ruby red strawberries from SLO Farm, perfect for dessert crepes (pair them with nutella for a real treat), 

and our favorite fingerling potatoes, that make a delicious salade nicoise, especially if you use fresh eggs


like these ones available from a new market vender, Out of Our Coop.


Another welcome addition to the market is a booth from the Southern Willamette Valley Bean and Grain Project, selling beans and grains from Hunton's Farm and Camas Country Mill. Also in attendance was the Fairmount Neighbors Association, selling copies of the Fairmount Neighborhood History Project Book. And many thanks to Manouche Noir who entertained market customers with laid back jazz.


Steamed Broccoli with Almonds and Orange Zest

Here's a quick recipe for SLO Farm's delicious fresh broccoli, which proved to be a big hit with the younger demographic in our household. Slice the stems and cut the florets into bite-sized pieces. Steam until just tender, about 4 minutes. Sprinkle with a handful of toasted almond slivers, a spritz of fresh orange juice, a pinch of orange zest, and a pinch of salt. Enjoy! We did so quickly that I didn't manage to get a picture. 

Thursday, June 16, 2011

Red and Blue Tart

The Fairmount Neighborhood Farmers Market will start this Sunday June 19th. Come down to the corner of Agate and 19th for fresh produce, local beans and grains, and some laid back Gypsy jazz from Manouche Noir (performing around 11 AM).  SLO Farm will be offering the following produce:
Strawberries!!!
Fresh Garlic
Parsley
Kale
Chard
Bok Choy
Broccoli Raab

Broccoli
Beets

Potatoes Lettuce Mix
Basil
Honey
Dried Cayenne Peppers

and flower starts


Think pesto, stir fries, salads, and curried greens. Here is a chard tart recipe I made as a variation on one from The Greens Cookbook. I like using swiss chard in tarts because it holds up well to the baking process. 
I sauteed the chard stems with onion for a lovely red color,
and paired this with a sharp blue cheese custard. For some fruit notes, I added some orange zest to the fresh chard leaves and some yellow raisins to the chard stems, and for some crunch, I topped the tart with toasted almonds,
and baked these in a yeast dough crust. The final tart made a satisfying meal, paired with a green salad.

Red Chard and Blue Cheese Tart
yeast tart:
tart filling:
  1. Prepare the tart dough. Combine the yeast, sugar and warm water and set aside until frothy. Combine the flour and salt in a large bowl. Stir in the egg. Cut in the butter, and combine in the cottage cheese. Stir in the yeast mixture, and form into a ball. The dough should be soft and moist, but if it feels too sticky, dust it with a little more flour. Cover and allow to rise for about an hour.
  2. Wash the chard leaves and trim off the ends of the stems. Cut the leaves off the stems. Chop the leaves finely into ~1/4 inch pieces. In a large bowl, toss the chopped chard leaves with 1 tablespoon olive oil, orange zest, salt and pepper and set aside.
  3. Soak the raisins in hot water for at least 20 minutes and then drain and squeeze dry. Peel and dice the onion. Cut the chard stems lengthwise and then chop into 1/4 inch pieces. Heat 3 tablespoons of olive oil in a pan over medium heat. Add the onions and cook until soft. Add the chard stems and continue cooking until the onions start to caramelize. Add the raisins and season with salt and pepper. Finally, add the red wine vinegar and cook a few more minutes until syrupy. Remove from heat and reserve.
  4. Preheat the oven to 375. Butter a 10 inch tart pan. Unwrap the dough and with your fingers gently flatten into an approximately 10 inch disc, dusting with a little more flour if necessary. Transfer to the pie pan and use your fingers to spread up the sides of the pan.
  5. Mix together 3 eggs and the cream. Crumble the gorgonzola. In a dry skillet, lightly toast the almond slivers.
  6. Assemble the tart. First layer into the tart dough the fresh chard leaves. Then layer on the cooked onions and chard stems. Then spread over the crumbled gorgonzola, and pour over the custard so that it is evenly distributed. Finally sprinkle over the toasted slivered almonds.
  7. Bake the tart at 375 for 45-55 minutes, until the dough is light brown and the custard is cooked through. Allow the tart to cool slightly before cutting it to serve.

Wednesday, June 8, 2011

Buckwheat Crepes


We are in countdown mode, counting down the days left in the school year, the hours left of grading exams, and the minutes until the sun will finally come out and start to ripen our summer fruit. Although the last of these is hard to pin down, one date you can count on is June 19 as the start of the Fairmount Neighborhood Farmers Market. Come down to the corner of Agate and 19th between 10 and 2:30 to hear some laid back Gypsy jazz from Manouche Noir, and pick up some farm fresh produce from SLO Farm. Also this year there will be locally grown beans and grains (garbanzos, lentils, wheat berry, and flour) from Hunton Family Farm and Camas Country Mill, as part of the Southern Willamette Valley Bean and Grain project. Here's a great video about this project.


One locally grown grain is buckwheat, which makes a great cover crop, but apparently has a limited market. My favorite use for buckwheat is in savory crepes. The buckwheat gives a heft to the crepes which makes them entirely different from dessert crepes and allows them to stand up to any number of filling one can scrounge from the fridge and pantry. Their versatility makes them a great weeknight dinner, and they are almost as quick to whip up as an omelette, especially if you make the batter in advance. We eat them in shift: whoever finishes the first round gets up to make the next. This time I used a buckwheat crepe batter recipe from thirschfeld at food52.


Prep your fillings before you start making the crepes. Here we sauteed apple slices in butter with some pieces of prosciutto, and grated some aged cheddar.


Pour the crepe batter into a well-heated, buttered pan, and swirl to coat.
 

When the batter has cooked so that it loses its pale color and develops permanent bubbles, flip the crepe and add the fillings. To accompany the crepes, I prepared a variant of another food52 recipe, this one from Amanda Hesser, of green beans with apricots and serrano ham. Because there was ham and apples in the crepes, I left these out of the bean dish and added some toasted almonds. I'm especially pleased to feature these food52 recipes because this week the site highlighted my recipes in their cooks spotlight. And I'm pleased to promote a local grain that deserves more followers.


Buckwheat Crepes with Apple, Prosciutto, and Cheddar


for the batter
1 cup unbleached all purpose flour
1 cup buckwheat flour
3 large eggs
1 1/2 cup whole milk
1/2 cup water
1 1/2 tablespoon unsalted butter, melted
a pinch of salt


for the filling
I apple, sliced
a few slices of prosciutto
several handfuls of grated cheese such as aged cheddar or gruyere.
butter

1. Prepare the batter. Combine the ingredients in a blender and mix until smooth. The batter should have the consistency of thick cream. It's best to let the batter rest for an hour or so before you use it. You can make it in the morning or even the night before your crepe dinner and if the butter separates out, just give it a quick mix.


2. Prepare the apple filling. In a crepe pan or skillet, saute the apple slices in ~1 Tbsp butter until they start to brown. Tear the prosciutto slices and saute with the apple for a couple more minutes and transfer to a bowl.

3. Wipe out the pan, melt a thin slice of butter and swirl to coat the pan. Pour in the crepe batter slowly while you swirl the pan so that it is just coated with batter. Cook until the batter loses its pale color and develops permanent bubbles. Secure a spatula under the crepe and flip with confidence. As the second side cooks, sprinkle a thin layer of cheese and apple and prosciutto toppings on one half of the crepe. Flip the naked half over the filling half and slide onto a plate. Eat while hot.

Wednesday, June 1, 2011

Birthday Rhubarb Buckle


We spent the weekend on the Oregon coast, soaking up the natural beauty, exploring the marine creatures of the intertidal zone,


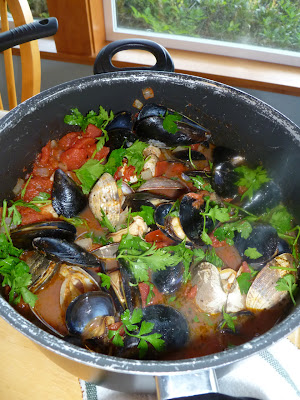
and consuming them for dinner (recipe: purchase a pound of mussels and clams and a decent bottle of white wine. Make a simple tomato sauce, add as much of the wine as you're willing to spare, steam the shellfish in the sauce until they open up, and eat them over linguini, accompanied by the remaining wine).


Food always taste better after a long stroll on the beach. And there's a certain pleasure to cooking with minimal equipment and supplies, a reminder that some of the tastiest food is the simplest, like fresh baked bread.


We did have an important cooking task at hand, since it was my husband's birthday. Rather than a cake, my daughter and I had decided to make him a rhubard ginger buckle, from the cookbook Rustic Fruit Dessert by Cory Schreiber and Julie Richardson. Everything I've made from this cookbook has been delicious, including another buckle, a cobbler, and a birthday pandowdy, but this is our favorite. My daughter had laboriously copied out the recipe, and we'd packed rhubarb and candied ginger. With no electric beater, we had to recruit the birthday boy into helping cream the butter, sugar, and eggs. 


The rest came together easily. The sliced rhubarb is simply folded into the cake batter, which is topped with a candied ginger crumble.


The final buckle is a delicious combination of tart fruit and sweet, spicy ginger topping. Perfect for a beachside birthday celebration.


Rhubarb Buckle with Ginger Crumb

from “Rustic Fruit Desserts” 
by Cory Schreiber and Julie Richardson

Ginger Crumb Topping

1/3 cup granulated sugar

¼ cup all-purpose flour

¼ cup finely chopped candied ginger

2 tablespoons unsalted butter, melted

Cake

1 ¾ cups all-purpose flour

1 teaspoon baking powder

1 teaspoon powdered ginger
½ teaspoon baking soda

½ teaspoon salt

¾ cup (1 1/2 sticks) unsalted butter, at room temperature

1 cup granulated sugar

2 eggs

¾ cup buttermilk, at room temperature

1 pound rhubarb, trimmed and thinly sliced (about 2 ½ cups, or 5 stalks)

1. Preheat oven to 350 degrees. Grease a 9-inch round baking pan with butter.

2. To make the topping, mix sugar, flour and candied ginger together in a bowl, then stir in melted butter, until well combined. Place crumb in freezer while you mix cake batter – this chills the crumb so it will not immediately melt into the cake when baked.

3. To make the cake, whisk flour, baking powder, ginger, baking soda and salt together in a bowl. Using a hand-held mixer with beaters or a stand mixer with the paddle attachment, cream the butter and sugar together on medium-high speed until light and fluffy, 3-5 minutes. Add eggs one at a time, scraping down the sides of the bowl after each addition. Stir in flour mixture in three additions, alternating with the buttermilk in two additions, beginning and ending with the dry ingredients and scraping down sides of the bowl as you progress. Gently fold in rhubarb.

4. Spread batter into the prepared pan, then sprinkle ginger crumb over the cake. Bake for 45-50 minutes, or until lightly golden and firm on top.

Wrapped in plastic wrap, the cake will keep at room temperature for 2-3 days.

Makes 8-12 servings.