Saturday, March 30, 2013

Sundry Uses for Homemade Sauerkraut


After attending the standing room only sauerkraut class by John Karlik from Sweetwater Farm, packed with eager hipsters taking copious notes, I recently tried my hand at sauerkraut making. At his demonstration, John had an impressive handmade mandolin about the size of a fruit crate that easily shredded a dozen cabbages in a matter of minutes, which got pounded down in a large tub by a couple of enthusiastic aughts using a large wooden paddle resembling a cricket bat. I started smaller scale with a single head of cabbage, a kitchen knife, and a five year old wielding a meat tenderizer. It worked.


After about twenty-four hours, the pounded, salted cabbage released enough of its own liquid to become submerged underneath the weight of a clean plate and gallon bag of water, allowing the inoculum of cabbage-associated Lactobacilli bacteria to flourish in the salty, oxygen-depleted brine and get busy fermenting. The recipe I followed from Karlik is essentially the same as this detailed one from Sandor Katz. The one difference is that rather than checking on it every couple of days, I left my crock rather neglected in the basement for about six weeks. When I finally remembered to take a peek, it had developed a skim of mold (Karlik had explained that he has a dedicated shop-vac for this), but once that was scraped off, the underlying kraut was delicious. One large cabbage produced two quarts. 


"What are those hipsters going to do with all that sauerkraut?" my sister wondered after I told her about Karlik's demo. I can highly recommend Karlik's vegetarian reuben sandwich with kraut piled on melted cheese and a generous slather of mustard. A less conventional use presented itself when it occurred to me that red cabbage sauerkraut is packed with pigments and lightly acidified: perfect for dying Easter eggs. 


Vegetarian Reuben with Homemade Sauerkraut
2 slices of sandwich bread 
several slices of sharp cheddar or swiss cheese 
homemade sauerkraut (follow this recipe from Sandor Katz)
dijon mustard

In a toaster oven or skillet, toast the bread lightly. Then layer on the cheese on one slice and continue toasting until the cheese is melted. Slather mustard on the other slice, heap on some sauerkraut, slap the two slices together, and enjoy.


Dyeing Easter eggs
For a lovely mottled blue pattern, submerge hard boiled white eggs in some red cabbage sauerkraut and wait a couple of hours. For a more even blue color, decant some sauerkraut juice into a small bowl and submerge your eggs in this. If you don't have red sauerkraut on hand, you can boil some red cabbage leaves in water and put in a splash of vinegar. Other natural dyes can be made with turmeric (yellow) and beets (pink).

Sunday, March 24, 2013

Whole Grain Bagels


With our steady supply of locally grown flours from our Lonesome Whistle Farm CSA, I’ve been experimenting with baking whole grain breads. I’ve attempted a number of versions of a whole grain sandwich loaf, which have all been delicious, but dense affairs hovering below the rim of the loaf pan, and I’ll need to keep tinkering before I share a recipe here. I'm pleased to report more success with another beloved bread product, the bagel. 


I was inspired by this evangelical speech about bread making by Peter Reinhart and my sister-in-law’s reports of bagel success. I'd also finally procured Reinhart's book on baking whole grain bread from the library that describes his “epoxy method” in which he makes two components of the dough a day in advance and combined them together on baking day. The first component is the soaker (right), which contains whole grain flours moistened and left at room temperature to allow enzymes in the grains to break down the complex polysaccharides, releasing sugars and developing flavor. I made our soaker with a combination of Lonesome Whistle Farm's red fife and rye flours. The second component is the biga or poolish (left), which contains a small amount of yeast which is allowed to ferment slowly in the refrigerator, also developing flavors. For this I used Lonesome Whistle's Stephen’s white, a soft white whole grain flour. 


The next day, we cut up the components and combined them with more yeast and Stephens white flour. This might have been easier if I had a mixer, but squishing together dough pieces was quite an appealing job for the kids. 


To form the bagels, we opted for rolling out snakes turned into bracelets, which Reinhart claimed is the professional option as compared to hollowing out circles, but I’m sure either method would work well. 


The most fun was boiling the bagels, watching them bob in their alkaline bath. And after baking in a hot oven, the final flavors of the dough were deliciously complex. The whole recipe only made six bagels, which seemed like a small yield for such a big undertaking, but they are really best eaten the same day. I recommend this as a fun project for spring break. 


Multigrain Bagels 

Soaker
2/3 cup (85 g) whole wheat flour [I used red fife]
1 cup (142 g) any combination of cooked and uncooked grains, or use 1 ¾ cup (227 g) whole wheat flour [I used a combination of red fife and rye]
½ tsp (4 g) salt
2 Tbsp (35.5 g) barley malt syrup or honey
½ cup (142 g) water

Mix all the ingredients together for 1 minute, let rest 5 minutes, mix again for 1 minute.
Cover loosely with plastic wrap and leave at room temp for 12 to 24 hours. 

Biga
1 ¾ cup (142 g) whole wheat flour [I used Stephen's white]
¼ tsp (1 g) instant yeast
½ cup (142 g) water

Mix all the biga ingredients together, knead for 2 minutes (use wet hands), let the dough rest for 5 minutes, then knead again for 1 minute.
Transfer to a clean bowl, cover and refrigerate from 8 hr to 3 days.

About 2 hours before mixing the final dough, remobe biga from the fridge.

Final dough
Soaker
Biga
2 ¼ tsp (7 g) instant yeast
2 Tbsp (28.5 g) water
5/8 tsp (5 g) salt
7 Tbsp (56.5 g) whole wheat flour [I used Stephen's white]
cornmeal
poppy or sesame seeds
2 tsp baking soda

1. Chop the biga and soaker into 12 pieces each. Dissolve the yeast in the water, add the pre-dough pieces, and the salt and mix vigorously. Add the flour and knead 2 minutes. Flour a surface and knead the dough on the surface for 4 minutes. Let rest for 5 minutes. Knead again for 1 minute. Form into a ball and place in a clean, oiled bowl, rolling to coat with oil. Cover loosely with plastic wrap and let rise at room temp for 45 to 60 minutes until 1 ½ times its original size. 

2. Cover a baking sheet with parchment paper or a silicone mat and dust with cornmeal. Divide the dough into six pieces and shape into bagels: roll into a snake and then wrap around. Place on the prepared baking sheet and cover loosely with a cloth towel. You can also refrigerate for 24 hours, covered with plastic wrap.

3. Preheat the oven to 500 degrees. Set a wide pot with 4 inches of water and bring to a boil. Add 2 tsp baking soda (watch out the water will foam). Lower the heat to a steady simmer.

4. Within 20 or 30 minutes of shaping, the bagels should be ready to boil. Test one: it should float within 30 seconds. If ready, boil 2 to 4 at a time, turning gently after 30 seconds so that they boil for a total of 1 minute. Use a slotted spoon to remove t the baking sheet. Cover with seed topping. 

5. Place the pan in the oven, lower the heat to 450 degrees, and bake for about 25 to 30 minutes, rotating the pan halfway through. Let cool for 20 minutes before serving.

Saturday, March 16, 2013

Chicken Liver Pate and Sunchoke Pickles


Chicken liver pate is a dish I remember fondly from my childhood as a fancy indulgence, rich and boozy, prepared for special occasions. Then at some point the combined threats of concentrated environmental toxins and artery-clogging cholesterol seemed to banish this dish from our family table and restaurant menus. Fair Valley Farm's conscientious animal husbandry alleviates the first concern, and  the cholesterol hysteria has wained a bit. So I decided to try my hand at this dish with a pound of Fair Valley Farm's chicken livers. However, the three sticks of butter that Jacque Pepin's classic French recipe would require did give me pause. After a little searching around, I came across this Tuscan chicken liver pate from food52 contributor gluttonforlife, flavored with capers, anchovies, lemon zest and Parmesan. The resulting spread was as rich and creamy as I remembered, and a splash of sherry rounded out the flavor. 


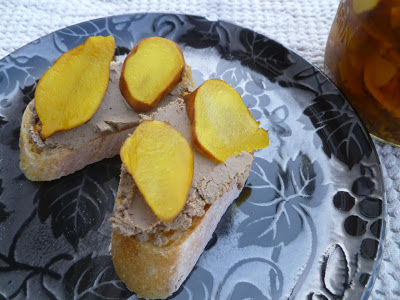
The final touch, a stroke of genius I would say, was to layer on some sunchoke pickles. These had been made in a frenzy with Open Oak Farm tubers that needed my attention before I left on a short trip. Sunchokes (also known as Jerusalem artichokes) resemble potatoes in appearance, but have a distinctive sweet, almost citrus flavor, and bright crunch due to their high inulin content instead of potatoes' starch. A less accessible complex sugar (appropriate for diabetics), inulin is considered a "prebiotic" that promotes healthy gut bacteria. This is all well and good, but a pile of gnarly sunchokes can be intimidating.


Confronted with these unfamiliar vegetables, I turned, as I often do in such situations, to The Victory Garden Cookbook by Marian Morash. Her last entry for Jerusalem artichokes was a pickle recipe, which called for a day of soaking in salty water, before being plunged in a vinegary bath. While picked fennel was a revelation last summer, these sunchokes are my new favorite. Their distinctive flavor shines through the vinegar and they made the perfect complement to the creamy pate slathered on Eugene City Bakery polenta baguette. There may even be a scientific basis for this complementarity, as inulin has been shown to have cholesterol-lowering properties: guilt-free pate sandwiches.


Tuscan Chicken Liver Pate
1 pound (preferably) organic chicken livers
2 tablespoons unsalted butter
2 tablespoons extra virgin olive oil
2 large shallots, thinly sliced
1 large garlic clove, smashed
3 anchovy fillets (or 1 tablespoon anchovy paste), chopped
1 tablespoon capers, minced
4 to 6 sage leaves, chopped
Salt and freshly ground black pepper
2/3 cup dry white wine
1/2 teaspoon grated lemon zest
1/2 cup grated Parmesan

1. In a large skillet, melt the butter and olive oil over medium-high heat. Saute the shallots, garlic, anchovies, capers and sage until the shallots are lightly browned, 6 minutes or so.

2. Season the chicken livers with salt and pepper and add them to the pan. Cook over high heat until browned, then add 1/3 cup of the wine and keep stirring with a wooden spoon, breaking up the livers as they start to cook through. When the wine is absorbed, add the remaining 1/3 cup and repeat the process.

3. Remove from the heat and transfer the mixture to a food processor. Process until quite smooth, then add the lemon zest and Parmesan and process again. Taste and add salt or pepper as needed. Serve warm or at room temperature, spread on good bread.

Note 1: for a looser, more mousse-like spread, don't let all the liquid evaporate from the pan. You can always adjust the consistency as you buzz it in the food processor by drizzling in olive oil, water or even wine as you mix in the food processor. I added a splash of sherry during the processing for a nice alcohol note.

Note 2: a pound a chicken liver pate may seem like a lot of a good thing. You can proceed with making this recipe prior to the point of adding the Parmesan cheese, then freeze half of it to finish later.


Sunchoke Pickles 

About 20 sunchokes
juice of one lemon
kosher salt for brining
1/2  cup water

3 cups apple cider vinegar

1/2 cup rice wine vinegar
1/4 cup sugar
1/2 tsp salt
1 tsp fennel seed

1 tsp mustard seed
1/2  tsp turmeric powder

1/4 teaspoon chili flakes


1. Scrub the sunchokes very well with a vegetable brush and remove any stringy bits. Prepare a bowl of salty cold water with lemon juice for brining the sunchokes, with 1 Tbsp kosher salt for each cup of water (you will need about 4 cups).

2. Slice the sunchokes into thin slices (about 1/8 inch thick) and submerge the slices into the brine. Cover and let soak for about 24 hours. 

3. The next day, prepare the pickling vinegar by combining in a small sauce pan the water, vinegar, sugar, salt, and spcies. Bring to a simmer and cook until the sugar dissolves, about five minutes. 

4. Let the vinegar cool for a moment while you rinse the sunchoke slices and pack them into clean glass jars. 2 pint jars or one quart jar should work. Now pour the vinegar solution over the sunchoke slices and press them down to submerge them. Seal the jars loosely, let them cool and then refrigerate. The pickles will be good to eat in a day and will keep for a few weeks.

Friday, March 8, 2013

Ume Grill's Japanese Style Rice Balls


Neighborhood food cart aficionados have been happy to see the return of Ume Grill to the Sun Automotive lot on the corner of 19th and Agate (now located in back, away from 19th). In addition to an expanded menu with chicken and tofu teriyaki, a new Ume offering is beautifully prepared bento boxes to go. On Thursdays, Ume will deliver pre-ordered bento boxes to Edison Elementary and Roosevelt Middle Schools as a welcome alternative to the unfortunately dismal cafeteria fare.


Ume co-owner Helen (aka Mama Ume), who in the past has graciously shared her recipe for tsukemono, was kind enough to help the Edison Girl Scouts earn their cooking badges by teaching them how to make their very own rice balls (example above). Helen even brought each girl her own bento box kit, complete with fun rice ball molds.


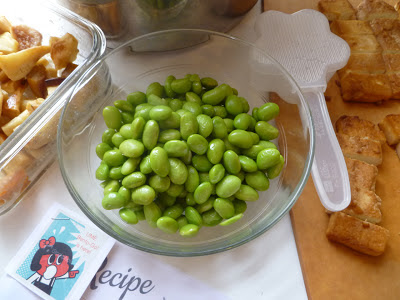
My resident Girl Scout was eager to teach me her new skills. We prepared rice, baked tofu, and edamame beans, and I cut up some leftover roasted parsnips and rutabaga. She demonstrated the proper rice packing, complete with finger dipping in salty water, and we sprinkled the rice balls with black sesame seeds (on hand from making gomae sauce)I was the only taker for cooked purple barley mixed into the rice, but the heart shaped rutabaga slices were consumed with enthusiasm, making me think that there is room for a rutabaga lover badge in the Girls Scout pantheon, between "entertainment technology" and "social butterfly." Thanks Ume Grill for sharing these delicious treats.


Ume Grill's Japanese Style Rice Balls

The beauty of these rice balls is that you can improvise and tailor them to any taste. This recipe gives the basic outline but you can pack them with whatever strikes your fancy.

You should gather together:
cooked rice (about 1/2 cup per rice ball, Helen recommends "hapa" rice: 3 parts medium grain white rice and 1 part brown rice)
a small bowl of sea salt water for finger dipping
rice mold (or use a teacup or ramekin lined with plastic wrap) 

any of the following fillings:
baked tofu (recipe below)
teriyaki beef or chicken
cooked edamame beans
carrots, cucumber, and other vegetables sliced into pretty shapes by hand or with a cutter

and some toppings:
nori seaweed sheets
sesame seeds
more sliced vegetables

Scoop some rice into the mold. Wet your fingers in the sea salt water and pat down the rice into a firm layer. Add some fillings (protein and vegetables). Add another layer or rice and pat down with wet fingers. Close the mold firmly to completely compress the rice ball. Open the mold and carefully dislodge the rice ball by inverting over your hand and pressing on the release tab on the back. Decorate the rice ball with strips of moistened nori, sesame seeds, and more sliced vegetables. Enjoy.

Baked tofu
1 package extra firm tofu
3 Tbsp soy sauce
1 Tbsp rice vinegar
1/2 tsp sugar
1/2 tsp sesame oil

Slice the tofu into 3/4 inch thick slabs. In a shallow baking dish, mix the marinade ingredients. Place the tofu slabs in the marinade and flip to coat both sides. Marinade for 30 minutes or so. Bake at 400 degrees for about 10 minutes per side, until the tofu has dried and firmed. I do this in a toaster oven. Once baked, cut the tofu slabs into desired sized pieces, or use a small cookie cutter for fun bento shapes.

Saturday, March 2, 2013

Mung Bean Pancakes with Kimchi


With a large supply of kimchi from our Open Oak Farm cabbages, a recent New York Times recipe for kimchi mung bean pancakes caught my eye. 


The article was about cooking with kids (in this case the daughter of chefs Jean-Georges and Marja Vongerichten).  I was skeptical that our kids would try pancakes with kimchi (my jars of fermenting cabbage are a source of jokes for them right now, but someday they will see the light). However, I thought the basic principle (similar to falafel) of making a batter from soaked, raw legumes could be the starting point for all sorts of pancakes. So for my recipe I left out the kimchi juice from the batter and incorporated grated raw carrots and chopped mint into half for kid-friendly Korean style latkes. Both versions were delicious as appetizers for dinner, and the remaining batter made a tasty lunch of fritters on top of a green salad. 


Mung Bean Pancakes
adapted from “The Kimchi Chronicles,” by Marja Vongerichten and Julia Turshen
makes about 20 pancakes
batter
2 cups split mung beans
1/4 cup short grain rice, such as sweet rice
1 cup water
1 tsp fish sauce (optional)
1 tsp soy sauce
1 tsp sesame oil
pinch of salt
1 cup kimchi (or 1 cup grated carrots and chopped mint, plus more salt)
neutral oil, such as canola, for frying

dipping sauce
1/4 cup soy sauce
1 tsp sugar
1 Tbsp sesame oil
1 Tbsp rice vinegar
1/8 tsp red pepper flakes
2 scallions, green and white parts finely chopped

for serving
cilantro leaves
lime slices
sriracha sauce

1. Combine the mung beans and rice in a fine-meshed colander and rinse well with cold water. Transfer to a bowl and add 8 cups of lukewarm water. Cover the bowl and soak at room temperature for at least 6 hours and up to 24 hours, changing the water once or twice.

2. Prepare the pancake batter by draining the soaked beans and rice and transferring them to the jar of a blender. Add 1 cup water, the fish sauce (if using), sesame oil, soy sauce, and salt and blend into a slightly coarse paste. Do not overmix. Transfer to a large bowl, finely chop the kimchi and stir into the batter. You could also divide the batter into two bowls and incorporate 1/2 cup finely chopped kimchi into one and 1/2 cup grated carrots, chopped mint, and a pinch of salt into the other.

3. To fry the pancakes, heat a large skillet, such as cast iron, over medium heat and add 1 to 2 tablespoons of the vegetable oil. Heat until the oil shimmers. Using a 1/4 cup measure, ladle in the pancake batter, flattening each pancake to 1/3-inch thickness. Cook until crisp and browned on one side, about 4 minutes. Flip the pancakes and cook until browned on the other side, another 2 to 4 minutes. Transfer to a paper towel-lined plate.

4. While the pancakes are cooking, you can make the dipping sauce by combining the soy sauce, sesame oil, rice vinegar, red pepper, and scallions in a small bowl and mix until blended.

5. Serve the pancakes warm with the dipping sauce, cilantro leaves, lime slices, and sriracha.